Set up Naia Build workspace
Aim: By the end of this use case, you will have the correct AI model selected, understand every panel and control lives, and be ready to start building applications in Naia Build with confidence.
Prerequisites
-
You are running a supported version of a Neptune DXP - Open Edition 24 or later.
Naia Build is available for versions Neptune DXP - Open Edition 24.12 MTS and above. -
If you are using Anthropic’s Claude as an AI model (recommended for richer output), you or your administrator must have entered a valid Claude API key in the Neptune DXP Portal in the Naia Build configurations to associate the Claude API key with either a personal account or organization account. Confirm this is done before you proceed.
-
Open your application in Neptune DXP - Open Edition’s App Designer, or create and new blank application in the App Designer and ensure that you are in edit mode.
Procedure
Activate the Naia Build AI experience
-
From within the App Designer, in the shell bar, activate Naia Build by selecting Agent.
Result: The workspace splits into two main panels: the live app edtior pane and tools to the left and the Naia Build AI experience panel to the right (with the Chat, Drag&Drop, Agents, Data, and History tabs).
-
Familiarize yourself with the Naia Build workspace. See Naia Build user interface at a glance.
Assign a model to the Naia Build AI experience
-
In the Chat tab of the AI experience panel, choose an AI model to power Naia Build in the Development Wizard.
Google’s Gemini is available by default as a foundational model as part of your account subscription to use immediately. Anthropic’s Claude models require your Claude API key to be configured and associated with an account in the Neptune DXP Portal. If comprehensive output quality matters for your project, select Claude.
-
To load the Claude API key that enforces specific account-based token limits, select Connect and Sign in to Neptune.
-
Sign in with your Neptune DXP Portal account credentials.
-
Sign in with your personal account to use your personal Claude API key.
-
Sign in with the user assigned to your organization to use the organization Claude API key.
If your personal user is associated with an organization, or your organization account has a personal Claude API key configured, both options are available for selection with the Development Wizard of Naia Build.
-
-
Select the Claude API key billing source relevant to either your personal account or organization account and select Update.
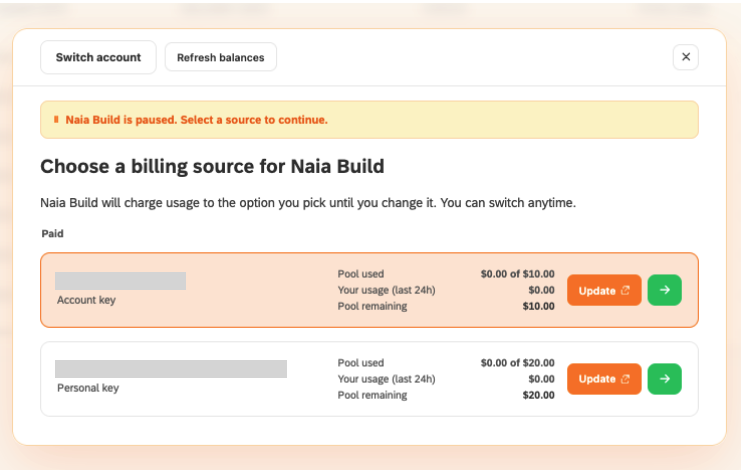
Result: You have connected the Claude API key to your personal account or organization account to use as a model within Naia Build.
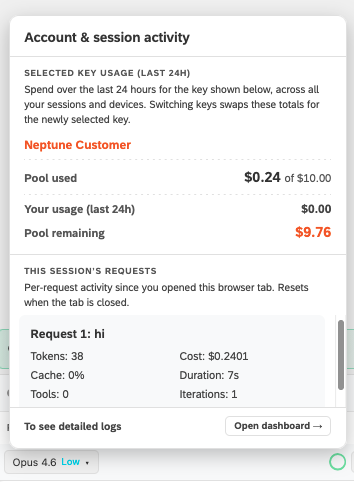
While developing, you can see the live session requests to keep track of the consumption. You can also switch between accounts (personal account or organization account) via Switch API Key.
Results
-
Your Naia Build workspace is configured and ready to use.
-
You have selected an appropriate AI model for your requirements and have confirmed your application settings to start prompting with the right context in place.
-
You are familiar with the panel layout.