Create Application Variant
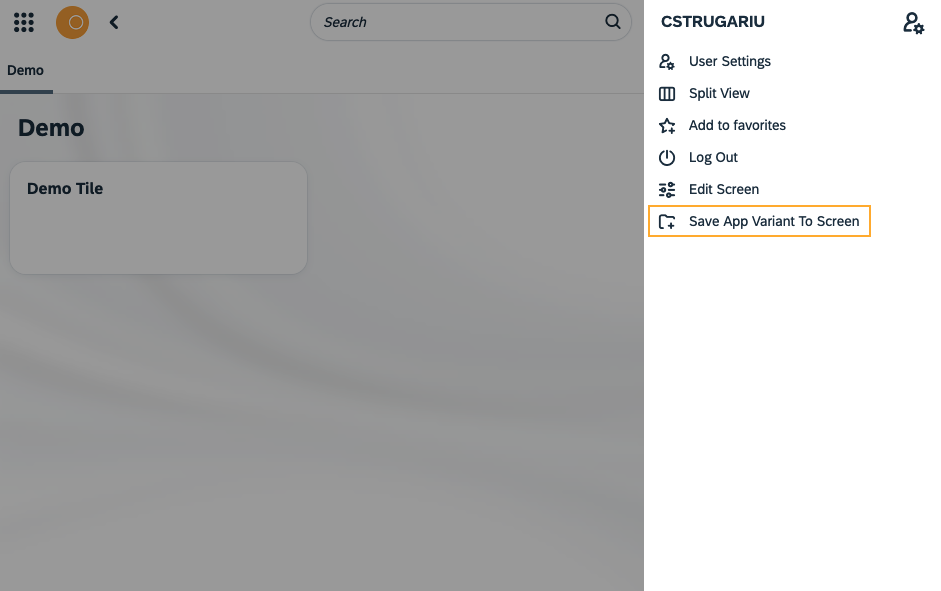
Save App Variant to screen
Many Neptune applications will have a list of some sort and a detail view of some sort. Users might want to create a tile that opens up a specific detail view. It can be a specific contract, a sales document of a specific employee detail view.
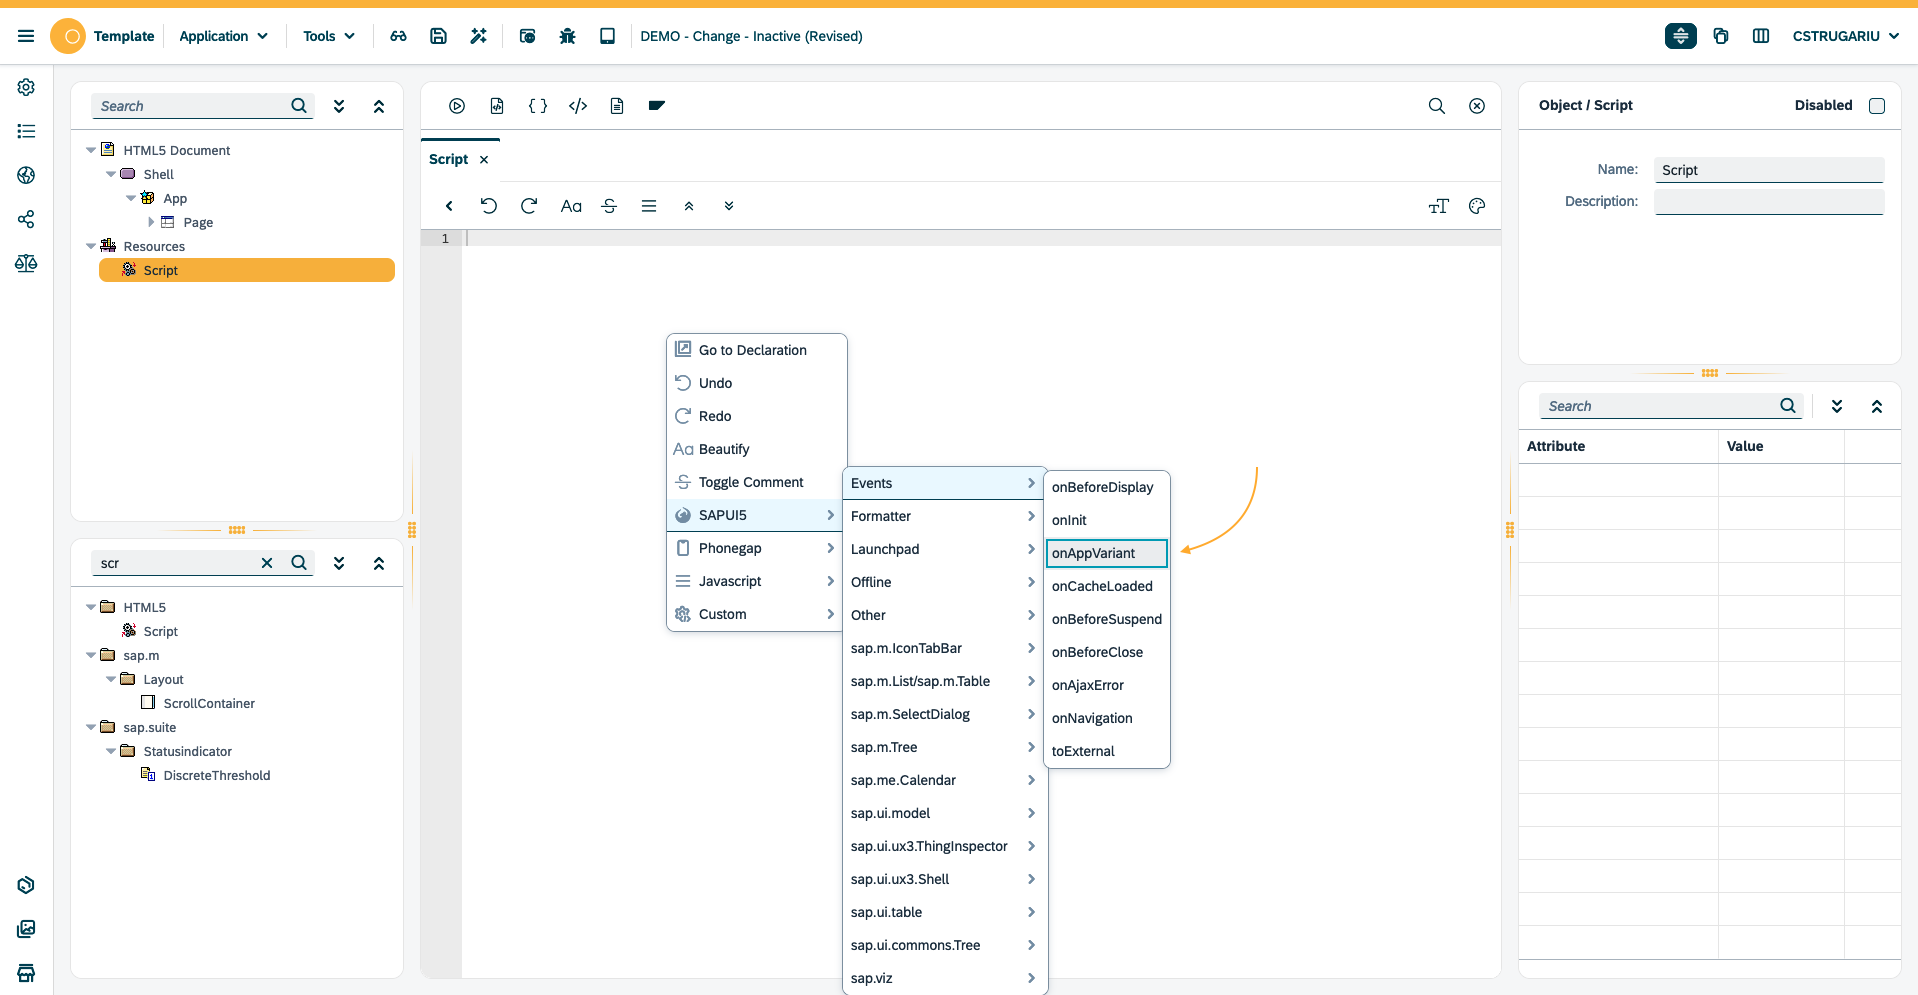
To enable the "Save App Variant", the application developer must create an App Variant Event Listener. This is done like all the other Neptune event listeners in the App Designer. This new one is the sap.n.Shell.attachAppVariant.
App Variant Event Listener
App variant event listener declaration
The event listener takes one parameter, a function which itself has a promise as a parameter. When the application is initialized in the Neptune Launchpad, the attachAppVariant is registered in the launchpad. When the application view has been build and the application is run, the function parameter from the the attachAppVariant event listener is executed. That is time for your code to shine! The promise resolve function expects a config object, more on that below. It’s up to you, the developer, to either call promise.resolve(config) to activate the App Variant functionality, or promise.reject, so silently reject the whole thing a pretend that nothing happened.
if (sap.n) {
    sap.n.Shell.attachAppVariant(function(promise) {
    });
}
Promise resolve config object
You as a developer can determine exactly which fields the user must fill out, so that you can get the data you need to build the App Variant. You add the fields in the config.inputFields object. When the user has filled in the data and clicks the save button, the config.onSave function is executed. This function has two parameters, the entered input field data and a promise you must call resolve on when you are done. This promise expects tile information, that will be stored in the SAP backend like any other tile. More on that below.
const config = {
    inputFields: {},
    onSave: function(data, promise) {}
}
Promise resolve config object: Input fields
In this example, some employee data is first fetched from the server in an online Ajax call. In the Ajax success handler, a list of employees is built and the promise resolve function is called with a list of input fields in the inputFields object.
There can be 3 different types of input fields:
-
Input field: A simple input field where the user can add some data.
-
Checkbox: A simple checkbox where the user has to choose between two choices.
-
Select field: A simple list of data the user can choose from, the list should not include more than 200 entries.
getOnlineTabMessenger().success(function(data) {
    var tabEmployee = [];
    $.each(modelTabMessenger.oData, function(i, data) {
        tabEmployee.push({
            key: data.PERNR,
            text: data.NAME
        });
    });
    promise.resolve({
        inputFields: {
            title: {
                label: "Title",
                type: "input",
                value: "",
                placeholder: "Tile title..."
            },
            pernr: {
                label: "Employee",
                type: "select",
                selectedKey: "10000002",
                selectData: tabEmployee
            },
            boss: {
                label: "Boss",
                type: "checkBox",
                selected: true,
                text: "Is this a boss or not!"
            }
        },
        onSave: function(data, promise) {
            ...
       }
    });
});
Promise resolve config object: Save function
When the user has entered data in the input fields defined by you in the config object input fields, the user clicks the "Save" button in the dialog. This will execute the onSave function you defined in the promise resolve config object.
In the onSave function you can read the data entered by the user and collect additional data. When you have all the data you need to create an App Variant Tile, you enter the data into a tile object. The tile object data object must have a very specific structure, because it will be generated together will all the standard tiles. Use the App Variant code snippet to get an overview of all the fields you can use.
The most important field will properly be the APPLID_PARAMS, where you can add data that will be available in the onInit and onBeforeDisplay event handlers.
promise.resolve({
    inputFields: {
        ...
    },
    onSave: function(data, promise) {
        var employee = ModelData.Find(TabMessenger, "PERNR", data.pernr)[0];
        var startParams = {
            pernr: data.pernr,
            boss: data.boss
        };
        var tile = {
            TILE_TITLE: data.title || employee.NAME,
            TILE_INFO: employee.PERNR,
            TILE_FOOTER: employee.PSTLZ + " " + employee.ORT01,
            TILE_ICON: employee.ICON,
            TILE_BACKIMAGE: employee.TILE,
            APPLID_PARAMS: JSON.stringify(startParams)
        };
        promise.resolve(tile);
    }
});