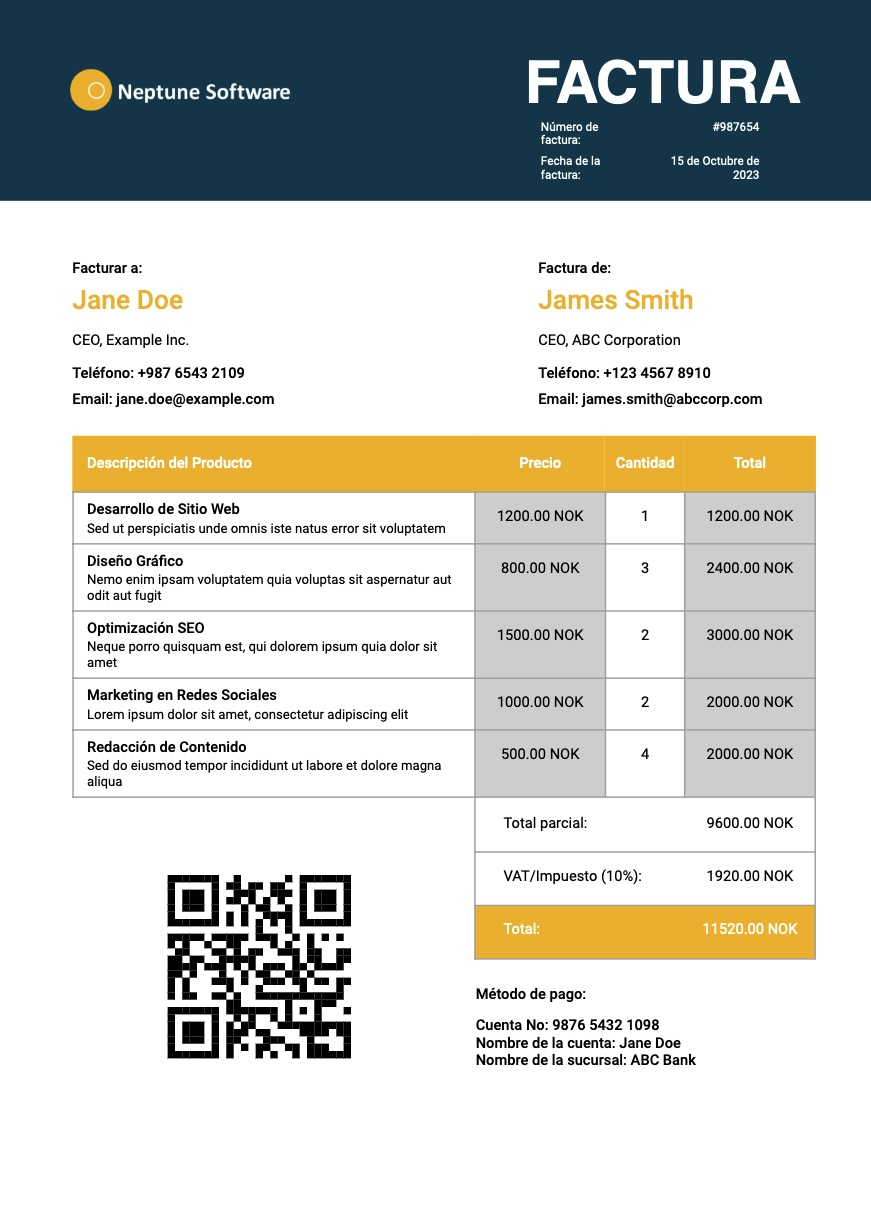
Creating a PDF from scratch
In this topic, you will learn how to create a simple PDF which will contain test data, tables, images and a QR code. This example will cover the essentials when it comes to creating PDFs in the PDF Designer.
Procedure
We will be using the following data which will be bound to specific components:
{
    "header": {
        "title": "FACTURA",
        "invoiceNumber": "#987654",
        "invoiceDate": "15 de Octubre de 2023"
    },

    "tabInvoice": {
        "items": [
            {"desc": "Desarrollo de Sitio Web", "desc2": "Sed ut perspiciatis unde omnis iste natus error sit voluptatem", "price": "1200.00 NOK", "quantity": "1", "total": "1200.00 NOK"},
            {"desc": "Diseño Gráfico", "desc2": "Nemo enim ipsam voluptatem quia voluptas sit aspernatur aut odit aut fugit", "price": "800.00 NOK", "quantity": "3", "total": "2400.00 NOK"},
            {"desc": "Optimización SEO", "desc2": "Neque porro quisquam est, qui dolorem ipsum quia dolor sit amet", "price": "1500.00 NOK", "quantity": "2", "total": "3000.00 NOK"},
            {"desc": "Marketing en Redes Sociales", "desc2": "Lorem ipsum dolor sit amet, consectetur adipiscing elit", "price": "1000.00 NOK", "quantity": "2", "total": "2000.00 NOK"},
            {"desc": "Redacción de Contenido", "desc2": "Sed do eiusmod tempor incididunt ut labore et dolore magna aliqua", "price": "500.00 NOK", "quantity": "4", "total": "2000.00 NOK"}
        ],
        "total": {
            "subtotal": "9600.00 NOK", "vat": "1920.00 NOK", "total": "11520.00 NOK"
        }
    },

    "invoiceTo": {
        "name": "Jane Doe",
        "title": "CEO, Example Inc.",
        "phone": "+987 6543 2109",
        "email": "jane.doe@example.com"
    },

    "invoiceFrom": {
        "name": "James Smith",
        "title": "CEO, ABC Corporation",
        "phone": "+123 4567 8910",
        "email": "james.smith@abccorp.com"
    },

    "paymentMethod": {
        "accountNo": "9876 5432 1098",
        "accountName": "Jane Doe",
        "branchName": "ABC Bank"
    },

    "contact": {
        "phone": "+987 6543 2109",
        "email": "jane.doe@example.com",
        "website": "www.exampleinc.com"
    },

    "termsCond": "Lorem ipsum dolor sit amet, consectetur adipiscing elit, sed do eiusmod tempor incididunt ut labore et dolore magna aliqua. Ut enim ad minim veniam, quis nostrud exercitation ullamco laboris nisi ut aliquip ex ea commodo consequat."
}
This will be placed in the Test Data tab for testing purposes. You may later on generate the same PDF with different data. For more information read Generate a PDF via a script
Default Style
Start by setting the default style of your PDF.
-
From the resource library, place a Default Style component in the PDF Document.
-
Set the following:
-
font to Roboto.
-
fontSize to 10.
-
In this way, your PDF will have the Roboto font with the text size to 10.
Styles
We will also include four Style components. These can be defined and then used on other components to override the existing default style.
-
From the resource library, place a Document>Styles component in the PDF Document.
-
Add a Element>Style into the previous component.
Name this
StyleHeaderand set the following:-
bold to true.
-
color to white.
-
fontSize to 40.
-

Settings
-
From the resource library, place a Settings component in the PDF Document.
-
Set the following:
-
pageMargins to
[0,150,60,0]. This sets the page’s surrounding margin ([left,top,right,bottom])
-
| You can enter a download name and password at downloadName and userPassword. |
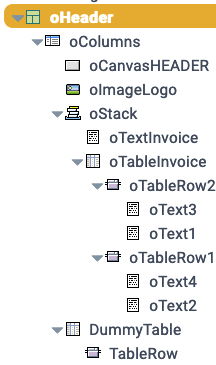
Header
Add a header which will contain an image and some invoice data.
-
From the resource library, place a Header component in the PDF Document.
-
Place a Columns component in the Header.
-
Place a Canva component in the Columns component.
-
Set the following in the Canva:
-
color to
#003e52. This sets the background color of the header to a dark blue. -
h to 140. Sets the height of the canva.
-
r to 0. Sets the boarder radius.
-
w to 900. Sets the width of the canva.
-
x to 0. Changes the
xcoordinate of the canva. -
y to 0. Changes the
ycoordinate of the canva.
-
-
-
Place an Image component in the Columns component.
-
Select a src from the Media Library.
-
Adjust the margin or the position based on the image’s dimensions.
-
-
Place a Stack component in the Columns component. This component will place all inner components on top of each other.
Set the following in the Stack:
-
left to 60.
-
right to 20.
-
Place a Text component in the Stack component.
Set the following in the Text:
-
-
Set noWrap to true.
-
Set top to 25.
-
Bind the text to
header>title. -
Set the style to
StyleHeader.-
Place a Table component in the Stack component.
-
Place two TableRow components in the Table component.
-
Place two Text components in each TableRow component. In boarder, set the value to
[false, false, false, false]. This will remove the surrounding boarder.
-
-
-
-
-
Place a Table component in the Columns component. This will act as a hidden element in order to render all components properly in the header.
-
Add TableRow in the Table.
-
The Header should look like this:
Content
-
From the resource library, place a Content component in the PDF Document.
-
Add four Column components within the Content.
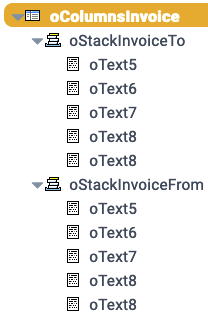
First column
Here, the PDF will display the invoice from and invoice to areas.
-
From the resource library, place two Stack components in the Column.
-
For each Stack, add five Text components.
-
In the first stack do the following:
-
For the first text, set the text property to
Invoice to. -
For the second text, bind text property to
invoiceTo<name. -
For the third text, bind text property to
invoiceTo<title. -
For the fourth text, bind text property to
invoiceTo<phone. -
For the fifth text, bind text property to
invoiceTo<email.
-
-
In the second stack do the following:
-
For the first text, set the text property to
Invoice from. -
For the second text, bind text property to
invoiceFrom<name. -
For the third text, bind text property to
invoiceFrom<title. -
For the fourth text, bind text property to
invoiceFrom<phone. -
For the fifth text, bind text property to
invoiceFrom<email.
-
| You can adjust the properties of these elements depending on your needs. |
This column should look like this:
Second column
-
From the resource library, place two Stack components in the Column.
-
Add a Stack in the Column. Set the top property to 100.
-
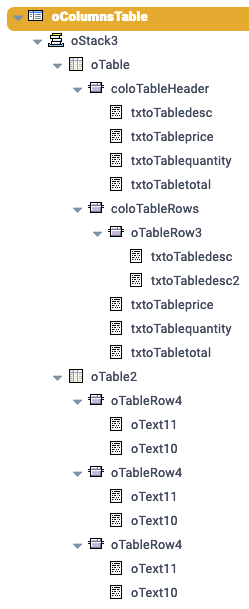
Add two Table components in the Stack.
-
In the first Table add two Tablerow components and do the following:
-
Set the Model Path to
tabInvoice>items. -
Set fillColor to
return '#fff'. -
Set hLineColor to
return '#a8a8a8'. -
Set vLineColor to
return '#a8a8a8'. -
Set headerRows to 1.
-
Set widths to
[265,80,45,80].-
In the first Tablerow add four Text components in the Tablerow.
-
Change the properties for the first Text as indicated in the image.
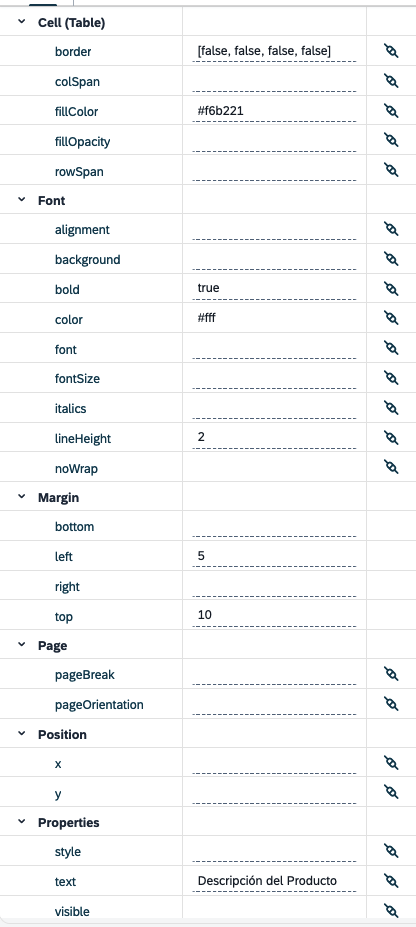
-
For the rest of the Text components, change the properties as indicated in the image.
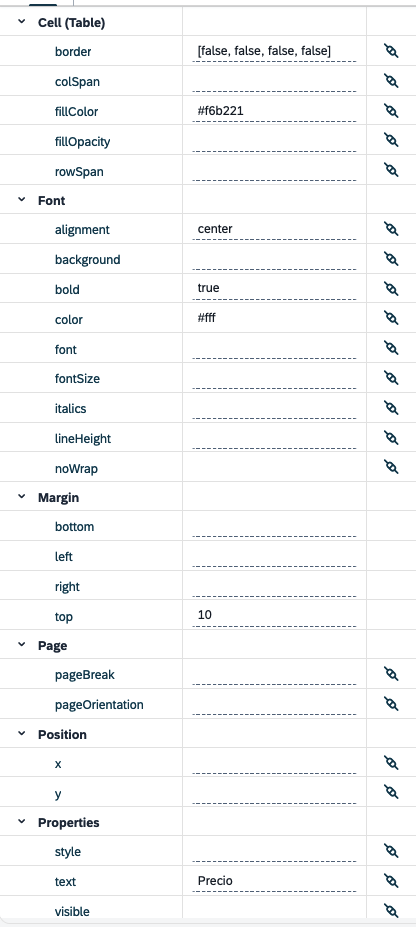
Please be sure to update the text value to reflect your specific data.
-
-
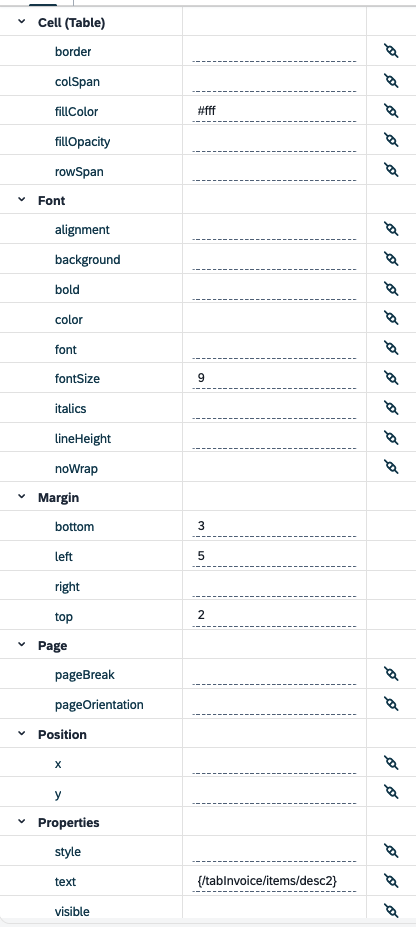
In the second Tablerow, add another Tablerow and three Text components.
-
Add two Text components within that Tablerow.
-
Change the properties for the first Text as indicated in the image.
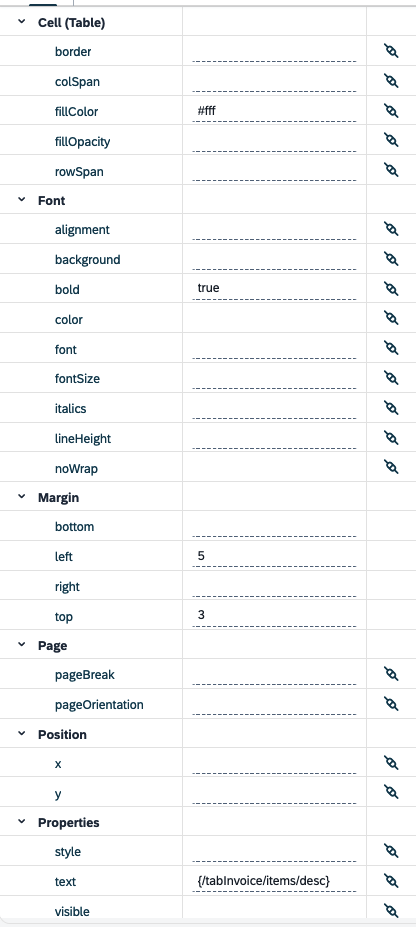
-
Change the properties for the second Text as indicated in the image.
-
-
-
For the other three Text components do the following:
-
Set a fillColor.
-
Set alignment to
center. -
Set top to 8.
-
For each component, bind the text to the keys within
tabInvoice>item.
-
-
-
-
In the second Table add three Tablerow components and do the following:
-
Set the Model Path to
tabInvoice>total. -
Set fillColor to
return '#fff'. -
Set hLineColor to
return '#a8a8a8'. -
Set vLineColor to
return '#a8a8a8'. -
Set left to 274.
-
Set widths to
[134, 80].-
For each of the three table rows, add two Text components.
For the first table row do the following:
-
Change the properties of the first Text as indicated in the image.
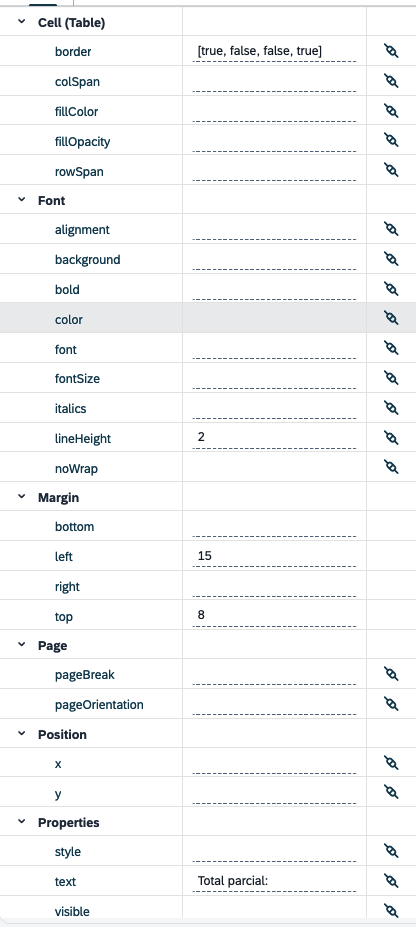
-
Change the properties of the second Text as indicated in the image.
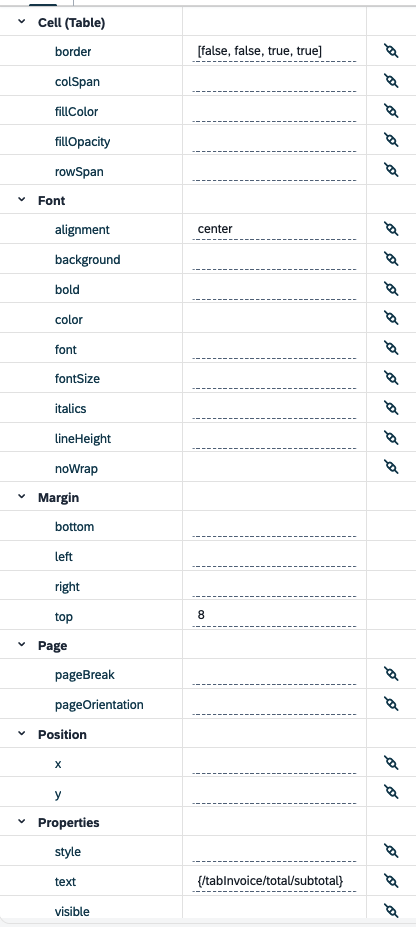
Apply the same properties to the rest of the text components with the other two table rows but, change the text property accordingly.
-
-
-
This column should look like this:
Third column
This column will hold the QR code.
-
For the Column, in Position, set x to 115 and y to 600. These values might need adjustments if more items are added in the PDF.
-
From the resource library, add a QR Code component in the Column.
-
Bind the qr to the value you want.
| You can use sources from the Media Library or other URLs. |
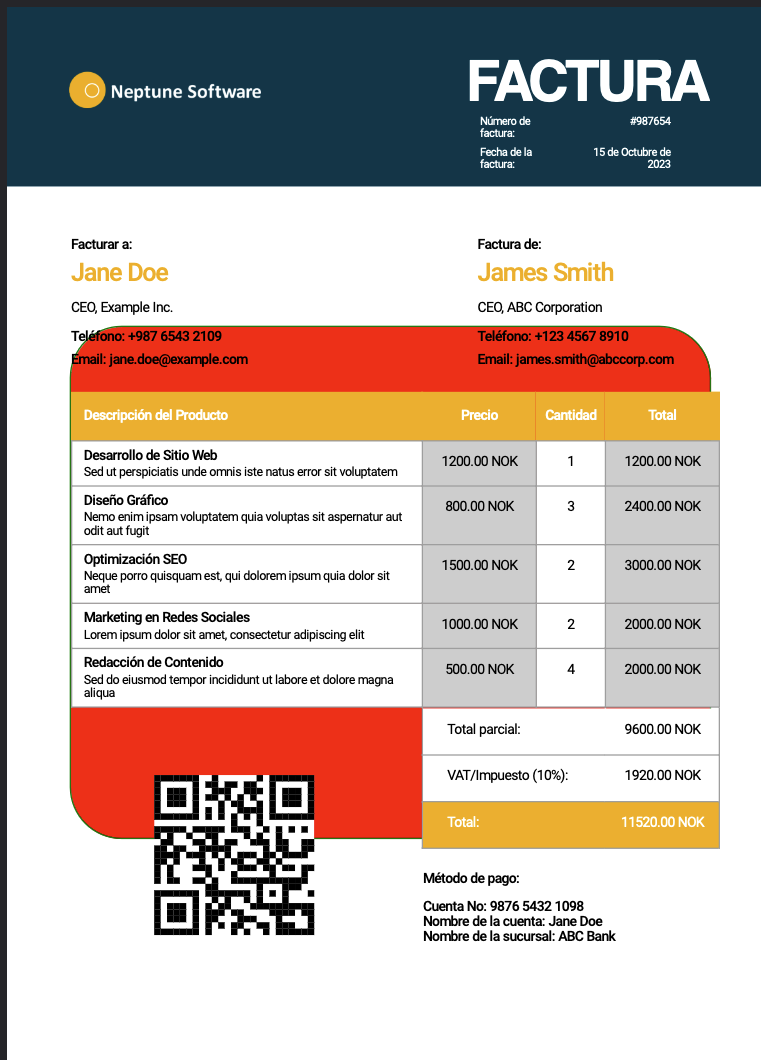
Background (Optional)
Set a background to your PDF.
-
From the resource library, place a Background component in the PDF Document.
-
Add a Canvas in the Background.
-
Set the following to the Canvas:
-
color to red.
-
h to 400.
-
lineColor to green.
-
r to 40.
-
w to 500.
-
x to 50.
-
y to 250.
-
The result of this background can be seen below.