Use Microsoft Entra ID roles claims
The Neptune DXP - Open Edition only supports the Microsoft Entra ID “roles” claim in ID tokens.
The “wids” claim that contains object IDs of general Microsoft Entra ID roles, is not supported.
| This procedure describes configuration aspects of the Neptune DXP - Open Edition authentication settings. As these directly affect the system security, these configuration steps must be thoroughly tested in an appropriate test environment. |
Prerequisites
-
You have created an enterprise application / app registration in Microsoft Entra ID.
-
You have configured an authentication method of type “Microsoft Entra ID” on the Neptune DXP - Open Edition system using this app registration.
-
You have defined the identically named roles in the Neptune DXP - Open Edition system that you expect in the token claims.
Procedure
-
Sign in to the Microsoft Azure Portal.
-
To define app roles for the application registered for the Neptune DXP - Open Edition authentication, select App registrations → <Your Application> → Manage → App roles → Create app role.
-
In the Create app role details screen, select Users/Groups for Allowed member types and fill in the remaining required fields.
-
Decide whether you want to enable the app role right away or later and apply your changes.
-
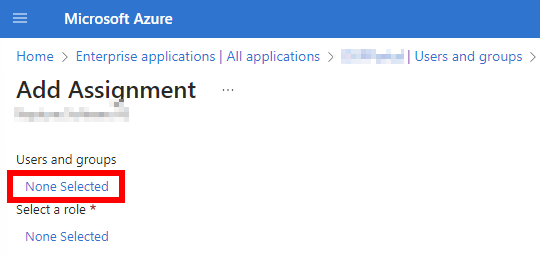
To assign the configured roles to users/groups within the enterprise application, select Enterprise Applications → <Your Application> → Manage → Users and Groups → Add User/Group.
-
In the Add Assignment detail screen, first select users/groups to which a role should be assigned to by selecting None Selected.
-
In the “Add Assignment” screen, select a role to be assigned (by selecting “None Selected”). At the moment, only one role can be assigned at the time. The previous assignment steps need to be repeated to assign additional roles.
-
Complete the assignment by selecting “Assign”.